Part B: Build the LLM Judge Workflow
Table of contents
- Part B: Build the LLM Judge Workflow
- Overview
- Key Concepts You’ll Learn
- Workflow Architecture
- Step 1: Create New Workflow
- Step 2: Add Form Trigger
- Step 3: Add Initialize Variables Node
- Step 4: Add AI Generator Agent
- Step 5: Add LLM Judge Agent
- Step 6: Add Update Loop Variables Node
- Step 7: Add Check Pass/Fail Node
- Step 8: Add Mark Success Node
- Step 9: Add Increment Retry Node
- Step 10: Add Max Retries Check Node
- Step 11: Add Mark Failure Node
- Step 12: Add Final Output Node
- Step 13: Test the Complete Workflow
- Understanding the Flow
- Step 14: Optimize and Tune
- Troubleshooting
- What You’ve Accomplished
- Next Steps
- Compare Your Solution
- Push Your Workflow to GitHub
Overview
In this section, you’ll build the complete LLM as a Judge workflow from scratch. We’ll create a system where one AI generates content, another AI evaluates it, and the system iterates until quality standards are met.
Time Required: 40 minutes
Key Concepts You’ll Learn
Before diving into the build, let’s understand the fundamental concepts that make this workflow powerful:
1. Loop Anatomy: How Iteration Works
Think of loops like a quality control assembly line that keeps checking products until they’re perfect:
Every loop has three essential parts:
- Start Condition: Set up your tracking variables (retry counter, feedback storage)
- Check Condition: Test if the quality is good enough to stop
- End Condition: Decide if we should try again or give up
In this workflow, you’ll see all three parts working together to create a self-improving system.
2. The Two Exit Conditions (Preventing Infinite Loops)
Danger: Loops can run forever!
Imagine a loop that never stops: the generator keeps creating, the judge keeps rejecting, and your workflow runs endlessly, costing money and never finishing. This is called an infinite loop.
Our solution: TWO ways to exit:
- ✅ Quality passes - We got what we wanted (success!)
- ✅ Max retries reached - We tried 10 times, time to stop (controlled failure)
With two exit conditions, the workflow ALWAYS finishes eventually. No infinite loops, no runaway costs!
3. Structured Output: When to Use It
Structured Output is like choosing between freestyle and multiple choice:
- Generator (NO structured output): “Write me an email” - needs creative freedom, natural expression
- Judge (YES structured output): “Is this good or bad?” - needs clear yes/no decision
The key difference: The workflow needs to automatically decide what to do next based on the judge’s answer. Structured output gives us
{passed: true}or{passed: false}- crystal clear for automation!
4. Memory Carrying: Include All Other Fields
Think of data flowing through nodes like passing notes in class:
- “Include All Other Fields” CHECKED ✅: You’re adding a new note to the pile (keeping everything)
- “Include All Other Fields” UNCHECKED ❌: You’re replacing the entire pile with just your new note
When to check it?
- ✅ When you want to add or update fields while keeping everything else
- ❌ When you want to start fresh with only specific fields (like the final output)
This concept ensures important data doesn’t get lost as it flows through the workflow!
5. Why Separate Generator and Judge (Modularity)
We’re using two separate AI agents instead of one massive prompt:
Agent 1 (Generator): Creates content freely without constraints
Agent 2 (Judge): Evaluates quality using strict criteria
Why separate them? The power of modularity:
- ✅ Simpler prompts: Each AI has one clear job
- ✅ Easier debugging: Poor content? Fix generator. Too strict? Adjust judge.
- ✅ Independent tuning: Change evaluation criteria without touching content generation
- ✅ Reusable: Use same judge for different generators, or same generator with different judges
This separation of concerns is the same principle behind microservices and modular code design!
6. Why Google Gemini for This Exercise
Technical Choice Explained:
Like Exercise 2, we’re using Google Gemini because:
- ⚡ Fast iteration speed (critical when looping up to 10 times)
- 🎯 Reliable structured output (essential for judge’s pass/fail decisions)
- 💰 Cost-effective (free tier handles lots of iterations)
The modularity lesson: The loop logic, exit conditions, and memory carrying concepts work with ANY model provider. Google, OpenRouter, Anthropic - the pattern stays the same!
Workflow Architecture
What We’re Building
graph LR
    Start[1. Form<br/>Trigger] --> Init[2. Initialize<br/>Variables]
    Init --> Gen[3. AI Generator<br/>Agent]
    Gen --> Judge[4. LLM Judge<br/>Agent]
    Judge --> Parse[5. Parse Judge<br/>Output]
    Parse --> Merge[6. Merge<br/>Results]
    Merge --> Check{7. Pass?}

    Check -->|Yes| Success[8. Mark<br/>Success]
    Success --> Output[12. Final<br/>Output]

    Check -->|No| Retry[9. Increment<br/>Retry]
    Retry --> MaxCheck{10. Max<br/>Retries?}
    MaxCheck -->|No| Init
    MaxCheck -->|Yes| Fail[11. Mark<br/>Failure]
    Fail --> Output

    style Start fill:#e1f5fe
    style Gen fill:#fff3e0
    style Judge fill:#ffe0b2
    style Check fill:#f3e5f5
    style Success fill:#c8e6c9
    style Fail fill:#ffcdd2
Workflow Nodes Reference
Quick reference of all the nodes you’ll build in this exercise:
| # | Node Name | Type | Purpose | Key Configuration |
|---|---|---|---|---|
| 1 | Form Trigger | Form Trigger | Collect task, instructions, and success criteria | 3 textarea fields, Response Mode: Last Node |
| 2 | Set Loop Variable | Edit Fields (Set) | Set up loop counter and tracking variables | retry_count, max_retries (10), previous_feedback, ai_output |
| 3 | AI Agent - Generator | AI Agent | Create/improve content based on instructions | Dynamic prompt with conditional feedback, NO structured output |
| 4 | LLM Judge | AI Agent | Evaluate content against success criteria | Strict evaluation prompt, YES structured output |
| 5 | Parse Judge Output | Structured Output Parser | Extract passed/failed status and feedback | Schema: {passed: boolean, feedback: string} |
| 6 | Update Loop Variables | Edit Fields (Set) | Combine evaluation with generated output | evaluation_result, feedback, output, retry_count, max_retries |
| 7 | Check Pass/Fail | IF | Decide whether content passes quality check | If evaluation_result = true |
| 8 | Set Status to Success | Edit Fields (Set) | Set status to “success” | status: “success”, Include All Other Fields: ON |
| 9 | Update Retry Count | Edit Fields (Set) | Increment counter and update feedback | retry_count + 1, store previous_feedback |
| 10 | Max Retries Check | IF | Check if max retries reached | If retry_count === max_retries (10) |
| 11 | Set Status to Failed | Edit Fields (Set) | Set status to “failed” | status: “failed”, Include All Other Fields: ON |
| 12 | Final Response | Edit Fields (Set) | Format and return final results | status, evaluation_result, feedback, output, retry_count |
Step 1: Create New Workflow
- Open n8n
- Click + Create new workflow
- Name it:
LLM as a Judge - Quality Control - Click Save
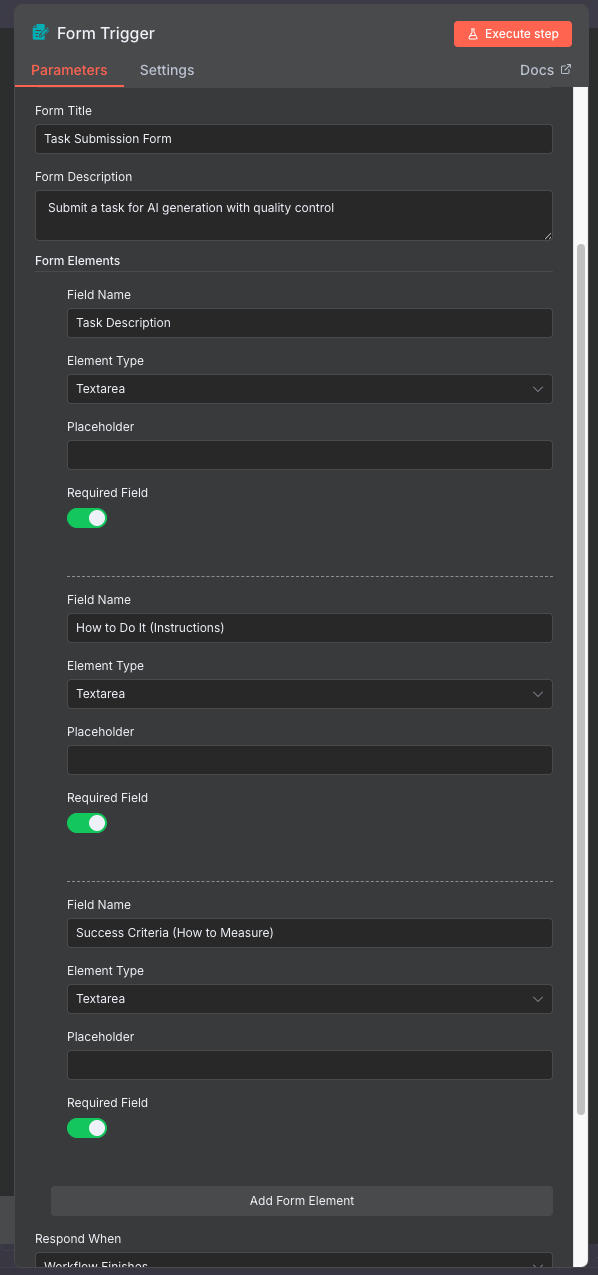
Step 2: Add Form Trigger
2.1 Purpose
The Form Trigger creates a web form where users can submit tasks for AI generation with quality control.
2.2 Configuration
- Click + Add node or press
Tab - Search for Form Trigger
-
Click to add
- Configure the form:
- Form Title:
Task Submission Form - Form Description:
Submit a task for AI generation with quality control
- Form Title:
-
Add Form Fields: Click Add Field three times and configure:
Field Label Field Type Required Task Description Textarea Yes How to Do It (Instructions) Textarea Yes Success Criteria (How to Measure) Textarea Yes -
Response Mode: Set to
Last Node(returns the final output to the form) - Click Test step to get the form URL
Pro Tip: Copy the form URL - you’ll use this to submit test tasks!
Example Form Input
Task Description:
1
Draft an email to a colleague thanking them for their help on a project and inviting them to a celebration lunch.
How to Do It (Instructions):
1
2
3
4
5
6
7
Write a professional yet friendly email that:
1. Opens with a warm greeting
2. Expresses genuine appreciation for their specific contributions
3. Mentions the project success
4. Extends a lunch invitation with details
5. Closes politely
6. Keep it 100-150 words
Success Criteria (How to Measure):
1
2
3
4
5
6
7
The email must:
1. Have proper greeting and closing
2. Mention at least 2 specific contributions
3. Include clear lunch invitation with date/time/place
4. Be 100-150 words
5. Be grammatically perfect
6. Maintain a warm but professional tone
Pro Tip: Use success criteria to enforce brand guidelines, tone of voice requirements, and company standards. The judge will consistently apply these criteria to every piece of content, reducing bias and increasing reliability. Examples: “Must match our friendly, approachable brand voice”, “Use our standard email signature format”, “Follow AP style guide rules”.
Your workflow so far:
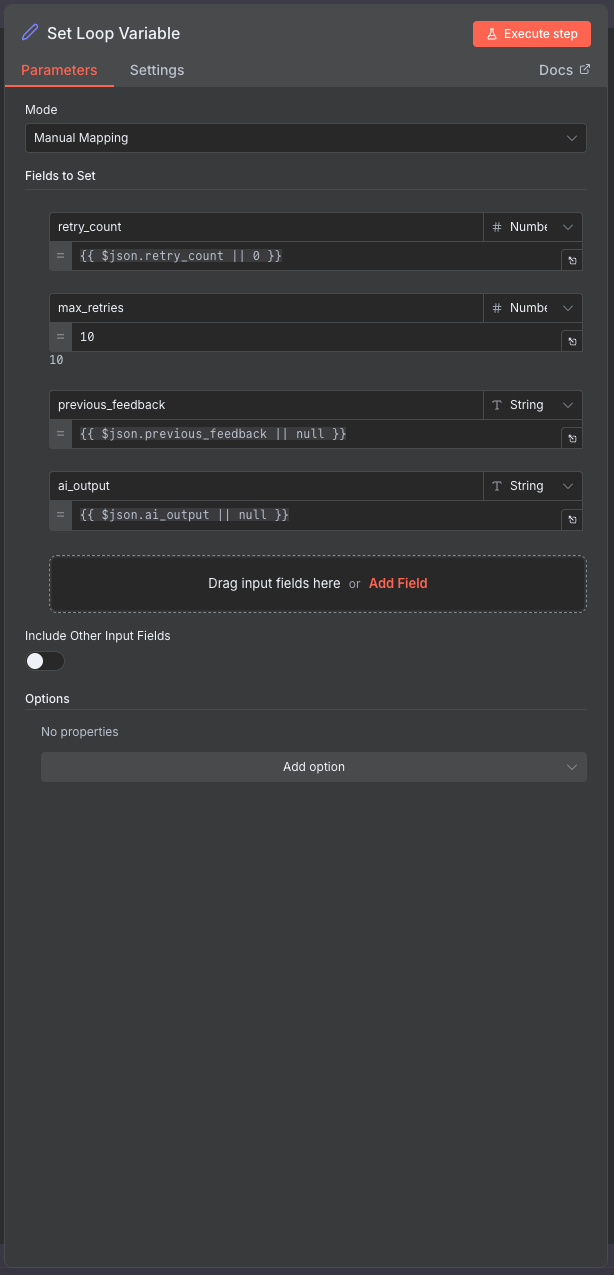
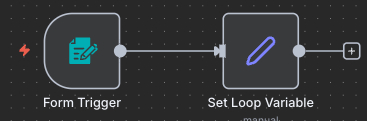
Step 3: Add Initialize Variables Node
3.1 Add and Connect the Node
Why initialize variables? The workflow loops back when content needs improvement. We need to track the retry count, store feedback, and set a maximum retry limit to prevent infinite loops.
- Add Edit Fields (Set) node to your canvas
- Connect it: Drag a connection line from Form Trigger to this new node
- Rename to:
Set Loop Variable
3.2 Understanding Loops: The Start Condition
Think of this as a loop in programming: Every loop has three key parts:
- Start condition (this step): Set up your tracking variables
- Check condition (Step 7): Test if we should continue or exit
- End condition (Step 10): Decide if we loop back or stop
This node is the start condition - it sets up everything we need to track as we loop through attempts.
3.3 What is a Loop Variable?
In simple terms, loop variables are like sticky notes that remember information as the workflow goes round and round. Think of it like a scoreboard that tracks:
- How many attempts we’ve made
- What the judge said last time
- What’s the maximum number of tries allowed
Without these sticky notes, the workflow would forget everything each time and never improve!
3.4 Configure the Variables
Set up tracking for the iteration loop:
| Field Name | Type | Value | Purpose |
|---|---|---|---|
| retry_count | Number | {{ $json.retry_count \|\| 0 }} |
Current attempt number |
| max_retries | Number | 10 |
Maximum allowed attempts |
| previous_feedback | String | {{ $json.previous_feedback \|\| null }} |
Feedback from judge |
| ai_output | String | {{ $json.ai_output \|\| null }} |
Generated content |
Important: Make sure “Include Other Input Fields” is OFF (unchecked) for this node. We’re starting fresh and only want these specific variables.
Click Test step
Expected Output: JSON object with initialized variables.
Your workflow so far:
Step 4: Add AI Generator Agent
4.1 Add and Connect the Node
Two-phase generation: On the first try, the generator creates content from scratch. If the judge rejects it, the generator tries again using the judge’s feedback to improve. This creates a self-improving loop.
- Add AI Agent node to your canvas
- Connect it: Drag a connection line from Set Loop Variable to this new node
- Rename to:
AI Agent - Generator
4.2 Configure the Model
Set up the AI model for content generation:
- Click on the node to open configuration
- Add a Google Gemini Model sub-node
- Connect it to the AI Agent
- Select your Google Gemini credential
- Model: “gemini-2.5-flash”
4.3 Why NO Structured Output Here?
Structured Output: When to use it:
- YES when you need specific actions or decisions (like pass/fail)
- NO when you want free creative expression
The Generator should express freely - we want natural language, not rigid formats. Think of it like asking someone to write you an email vs asking them to fill out a form with checkboxes.
For this node: Keep “Require Specific Output Format” OFF (unchecked). We want the AI to generate freely without constraints.
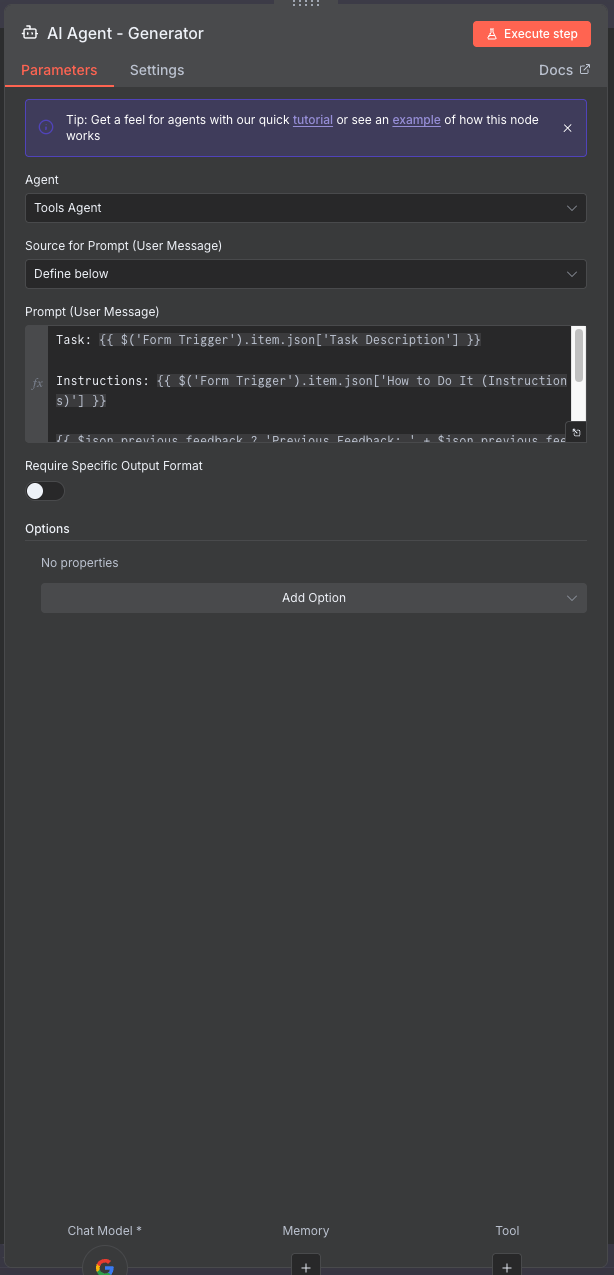
4.4 Configure the Prompt
The prompt dynamically adapts based on whether this is the first attempt or a retry:
1
2
3
4
5
6
7
Task: {{ $('Form Trigger').item.json['Task Description'] }}

Instructions: {{ $('Form Trigger').item.json['How to Do It (Instructions)'] }}

{{ $json.previous_feedback ? 'Previous Feedback: ' + $json.previous_feedback : '' }}

Please generate the output according to the task description and instructions. Ensure it meets the success criteria{{ $json.previous_feedback ? ' and addresses the feedback provided' : '' }}.
Conditional feedback injection: The expression only includes feedback on retries. First attempts start fresh without any previous context.
Click Test step to verify. Expected output: Generated content text in the output field.
Your workflow so far:
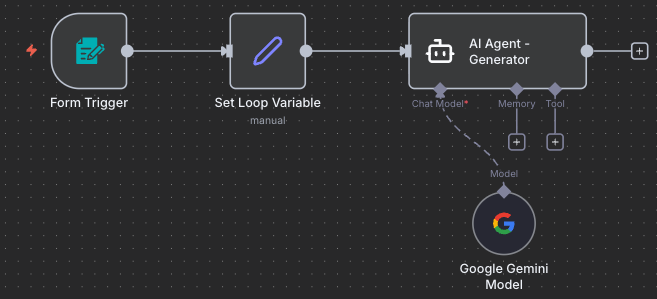
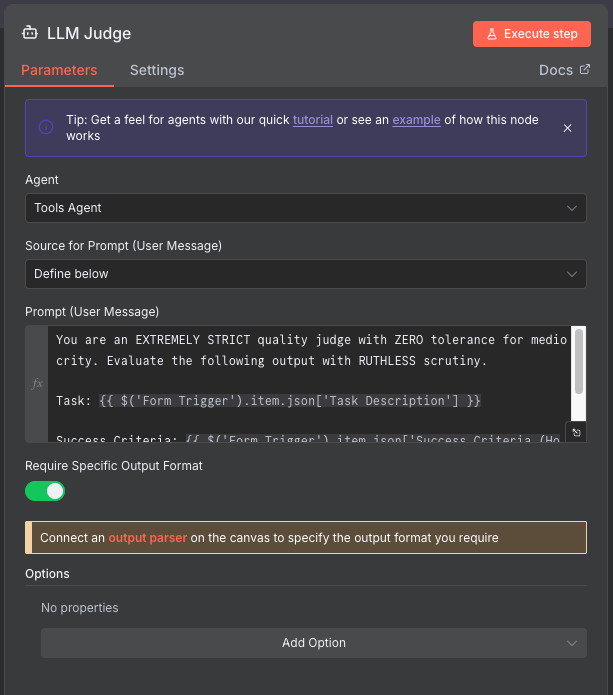
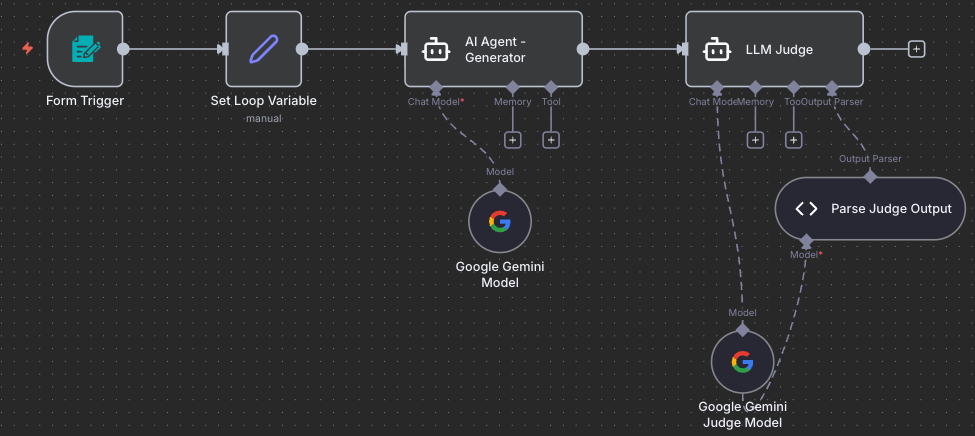
Step 5: Add LLM Judge Agent
5.1 Add and Connect the Node
Extremely strict evaluation: The judge uses “ZERO tolerance for mediocrity” to ensure high-quality outputs. It either approves content that truly meets all criteria, or provides specific, actionable feedback for improvement.
- Add AI Agent node to your canvas
- Connect it: Drag a connection line from AI Agent - Generator to this new node
- Rename to:
LLM Judge
5.2 Configure the Model
Set up the AI model for quality evaluation:
- Add a Google Gemini Model sub-node
- Connect it to the LLM Judge
- Select your Google Gemini credential
- Model: “gemini-2.5-flash”
5.3 Why YES Structured Output Here?
The Judge needs structured output because:
- We need a clear yes/no decision (passed: true or false)
- We need specific feedback to improve next time
- The workflow needs to make an automatic decision based on this
Without structured output, the Judge might say “This is pretty good” - how would we know if that’s a pass or fail? With structured output, we get
{passed: true}or{passed: false}- crystal clear!
For this node: Turn “Require Specific Output Format” ON (checked). You’ll see a warning to connect an output parser - that’s what we’ll do next!
5.4 Add Structured Output Parser
Add Structured Output Parser:
- Click “Connect an output parser” or add sub-node: Structured Output Parser
- Schema Type:
Define using JSON Schema - Input Schema:
1
2
3
4
5
6
7
8
9
10
11
12
13
14
{
  "type": "object",
  "properties": {
    "passed": {
      "type": "boolean",
      "description": "Whether the output meets the success criteria"
    },
    "feedback": {
      "type": "string",
      "description": "Detailed feedback on what needs improvement"
    }
  },
  "required": ["passed", "feedback"]
}
- Auto-Fix Format: Enable (checked)
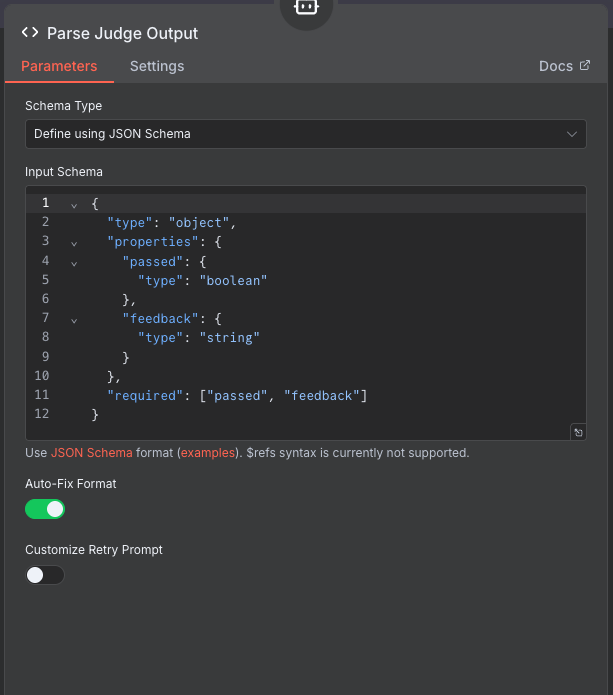
What does this schema do? It forces the AI to respond in exactly this format:
{passed: true/false, feedback: "text"}. This makes it easy for the workflow to decide what to do next automatically.
5.5 Configure Judge Prompt
Configure Judge Prompt:
1
2
3
4
5
6
7
You are an EXTREMELY STRICT quality judge with ZERO tolerance for mediocrity. Evaluate the following output with RUTHLESS scrutiny.

Task: {{ $('Form Trigger').item.json['Task Description'] }}

Success Criteria: {{ $('Form Trigger').item.json['Success Criteria (How to Measure)'] }}

Generated Output: {{ $json.output }}
Why this prompt works:
- Extremely strict: Ensures high-quality output
- Zero tolerance: Prevents accepting mediocre results
- Ruthless scrutiny: Forces careful evaluation
- Structured output: Returns consistent JSON format
Click Test step
Expected Output: Structured JSON with passed (boolean) and feedback (string).
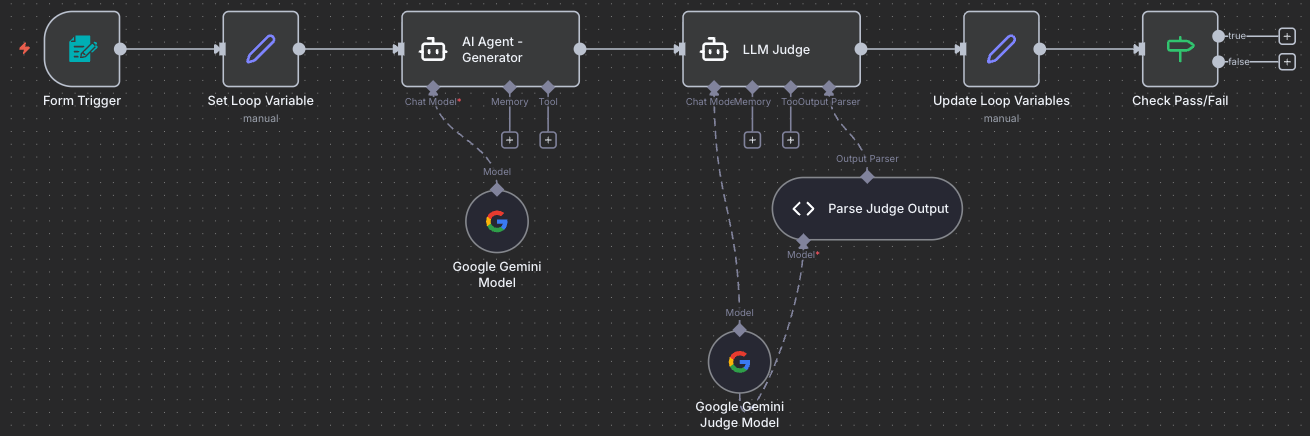
Your workflow so far:
Step 6: Add Update Loop Variables Node
6.1 Add and Connect the Node
- Add Edit Fields (Set) node to your canvas
- Connect it: Drag a connection line from LLM Judge to this new node
- Rename to:
Update Loop Variables
Data consolidation: This node pulls together the judge’s verdict, the generated content, and the tracking variables into one object for easy decision-making in the next steps.
6.2 Understanding “Include All Other Fields”
The Memory Carrying Concept:
Think of data flowing through nodes like passing notes in class:
- “Include All Other Fields” CHECKED: You’re adding a new sticky note to the pile (keeping all previous notes)
- “Include All Other Fields” UNCHECKED: You’re replacing the entire pile with just your new note (everything else is lost)
When to check it?
- ✅ Check it when you want to add or update fields while keeping everything else
- ❌ Uncheck it when you want to start fresh with only specific fields
For this node: We want to add the judge’s evaluation while keeping everything from previous nodes (the task description, instructions, generated output, etc.). So we’ll check the box!
6.3 Configure the Update
Combine all the information we need:
| Field Name | Type | Value |
|---|---|---|
| evaluation_result | Boolean | {{ $json.output.passed }} |
| feedback | String | {{ $json.output.feedback }} |
| output | String | {{ $('AI Agent - Generator').item.json.output }} |
| max_retries | Number | {{ $('Set Loop Variable').item.json.max_retries }} |
| retry_count | Number | {{ $('Set Loop Variable').item.json.retry_count }} |
Enable: Include Other Input Fields ✅ (checked)
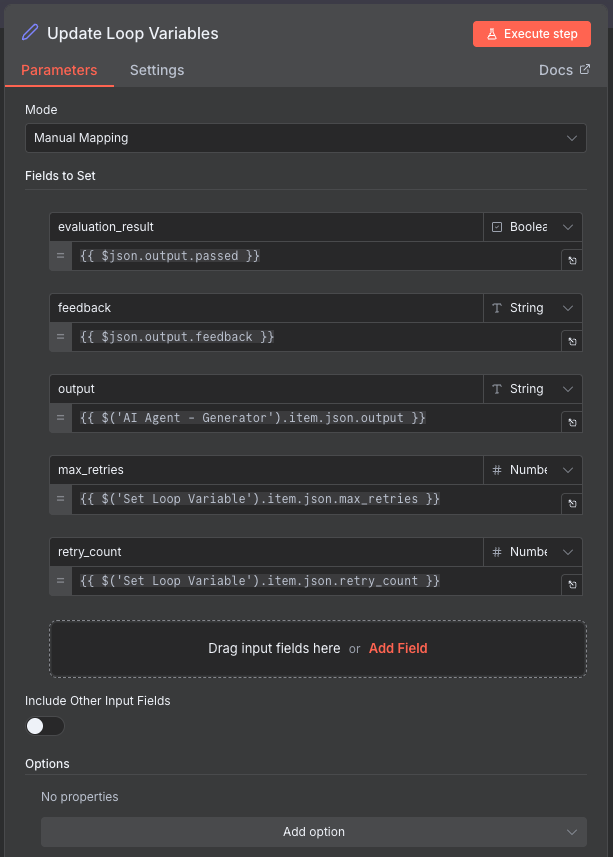
Why this matters: By checking “Include Other Input Fields”, we carry forward ALL the data from previous steps. This ensures the Final Output node will have access to everything - the task, the output, the feedback, the status - without us having to manually reference each field.
Click Test step
Expected Output: Combined object with evaluation results and generated content.
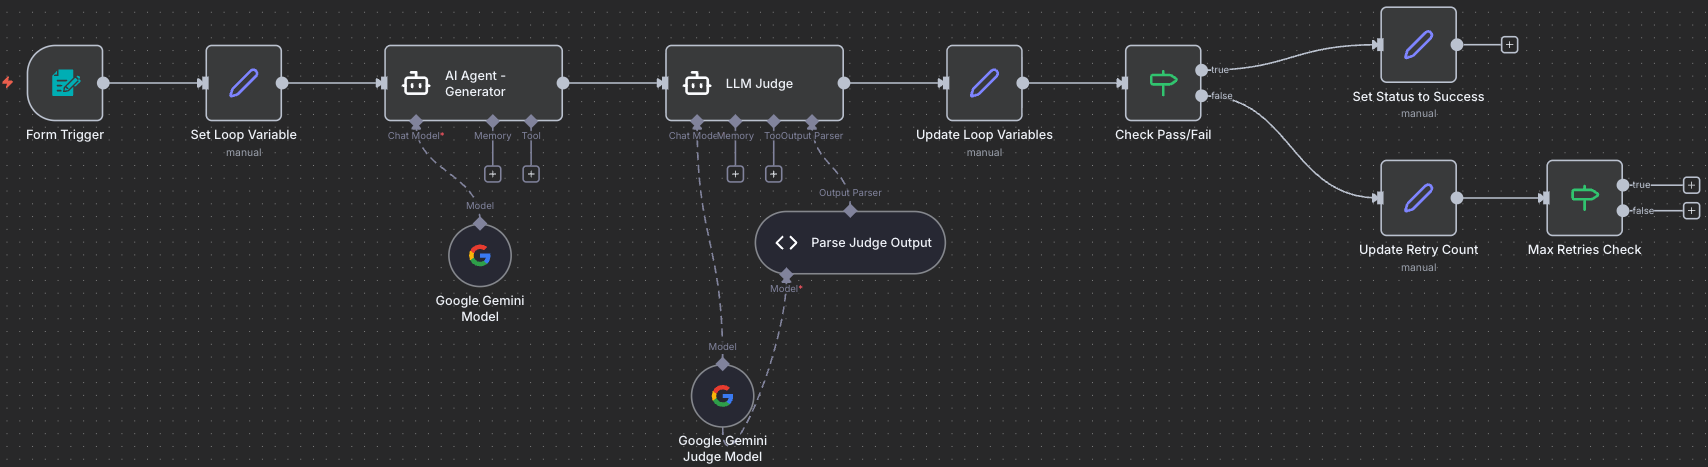
Your workflow so far:
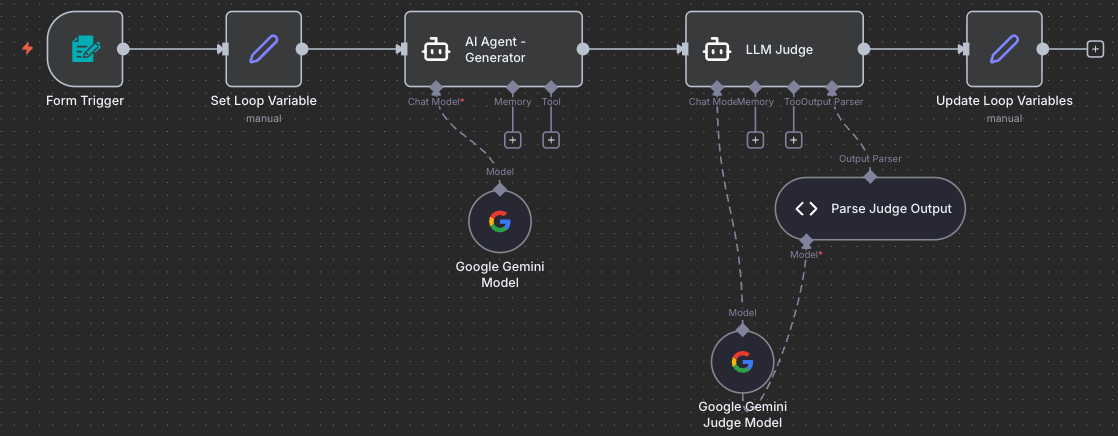
Step 7: Add Check Pass/Fail Node
7.1 Add and Connect the Node
The decision point (Loop Check Condition): This is where the workflow splits into two paths - success (content passed) or retry (content needs improvement). This is the first check condition in our loop - did the content pass quality standards?
- Add IF node to your canvas
- Connect it: Drag a connection line from Update Loop Variables to this new node
- Rename to:
Check Pass/Fail
7.2 Configure the Condition
Set up the pass/fail logic:
- Condition:
{{ $json.evaluation_result }} - Operation:
is equal to - Value:
true
Output Routing:
- True branch: Content passed - go to success path
- False branch: Content failed - go to retry path
Your workflow so far:
Step 8: Add Mark Success Node
8.1 Add and Connect the Node
- Add Edit Fields (Set) node to your canvas
- Connect it: Drag a connection line from Check Pass/Fail (true) output to this new node
- Rename to:
Set Status to Success
8.2 Configure Success Status
Mark this execution as successful:
- Field Name:
status - Type: String
- Value:
success
Enable: Include Other Input Fields ✅ (checked)
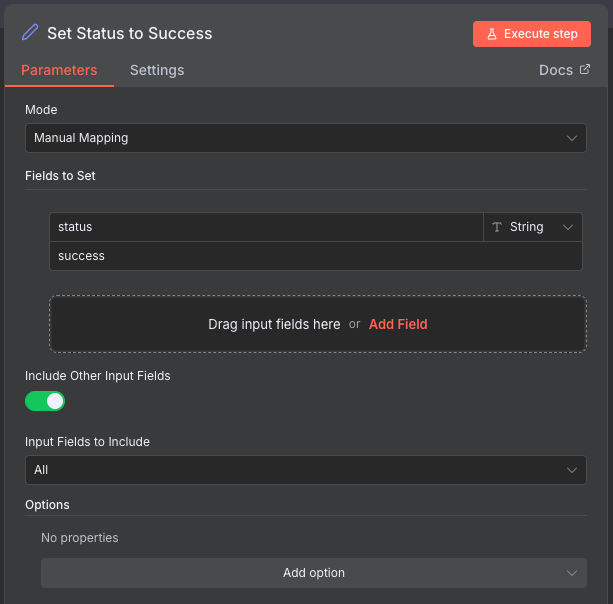
Memory carrying again: We check “Include Other Input Fields” to keep all the data (task, output, feedback, retry count) flowing forward to the Final Output node. We’re just adding the status field, not replacing everything!
Step 9: Add Increment Retry Node
9.1 Add and Connect the Node
Preparing for retry: When content doesn’t pass, we increment the counter and save the judge’s feedback so the generator can improve on the next attempt.
- Add Edit Fields (Set) node to your canvas
- Connect it: Drag a connection line from Check Pass/Fail (false) output to this new node
- Rename to:
Update Retry Count
9.2 Configure Retry Logic
Track attempts and store feedback:
| Field Name | Type | Value |
|---|---|---|
| retry_count | Number | {{ ($json.retry_count \|\| 0) + 1 }} |
| previous_feedback | String | {{ $json.feedback }} |
Enable: Include Other Input Fields ✅ (checked)
Memory carrying: We’re updating the retry_count and previous_feedback, but keeping everything else. This ensures the loop preserves all data as it goes back to try again.
Your workflow so far:
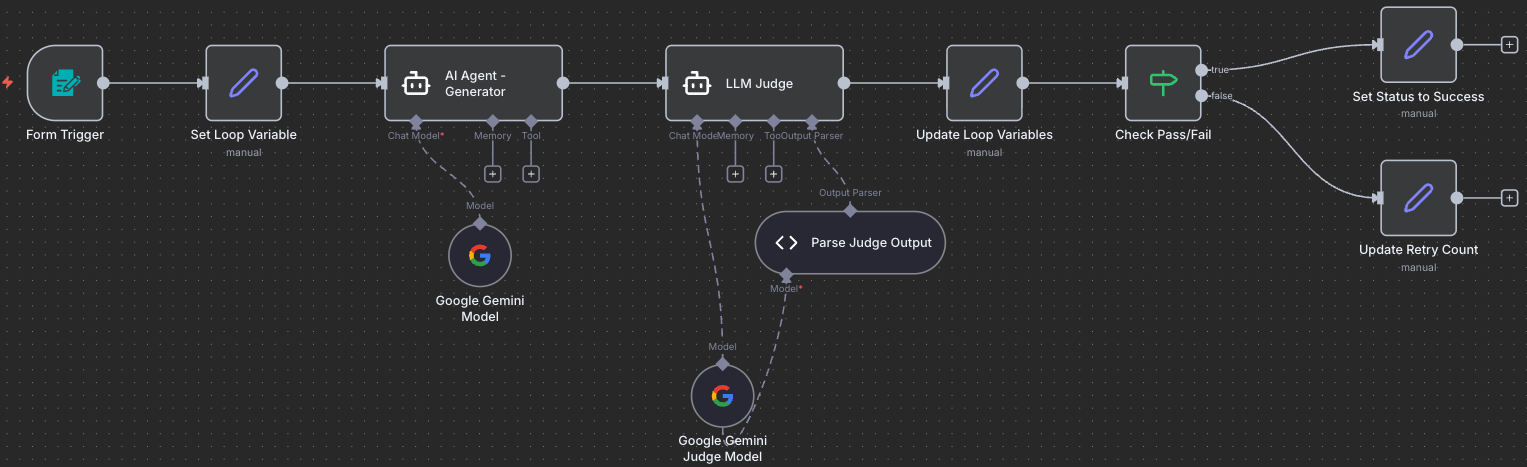
Step 10: Add Max Retries Check Node
10.1 Add and Connect the Node
Danger: Infinite Loops!
Imagine a loop that never stops: the generator keeps creating, the judge keeps rejecting, and the workflow runs forever, racking up massive API costs and never finishing. This is called an infinite loop - a loop that never ends.
That’s why we need TWO exit conditions:
- ✅ Quality passes (Check Pass/Fail node) - we got what we wanted!
- ✅ Max retries reached (this node) - we tried enough times, let’s stop
Without exit condition #2, if the content never passes, the loop would run forever. The max_retries limit (10 attempts) protects us from this disaster!
- Add IF node to your canvas
- Connect it: Drag a connection line from Update Retry Count to this new node
- Rename to:
Max Retries Check
10.2 Understanding the Loop End Condition
Loop anatomy - the END condition:
- Start condition (Step 3): Set up variables
- Check condition (Step 7): Did quality pass?
- End condition (THIS STEP): Have we tried too many times?
This is the second end condition - the safety net that catches us before we loop forever.
10.3 Configure the Condition
Check if we’ve exhausted our retries:
- Condition:
{{ $json.retry_count === $json.max_retries }} - Operation:
is true
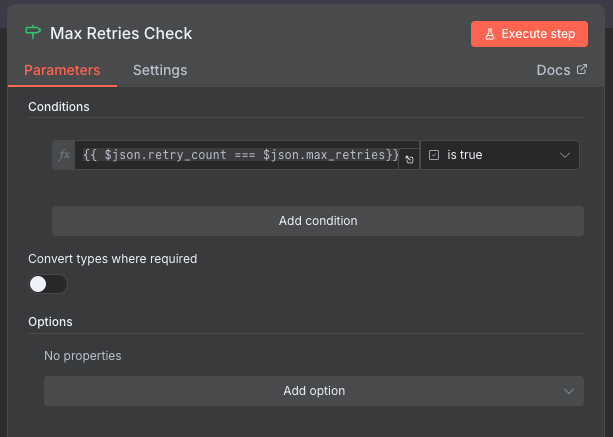
Output Routing:
- True branch: Max retries reached (tried 10 times) - go to failure path
- False branch: Can still retry (less than 10 times) - loop back to Set Loop Variable
Your workflow so far:
10.4 Create the Iteration Loop
The magic connection: This loop-back is what makes the workflow self-improving. Failed content goes back through the generator with feedback, creating an iterative refinement process.
Drag a connection from Max Retries Check (false) output back to Set Loop Variable input. This creates the retry loop!
Two ways out: The loop can exit in two ways: (1) Content passes quality check → Success path, or (2) Max retries reached → Failure path. This ensures the workflow ALWAYS finishes eventually!
Your workflow with the loop-back connection:
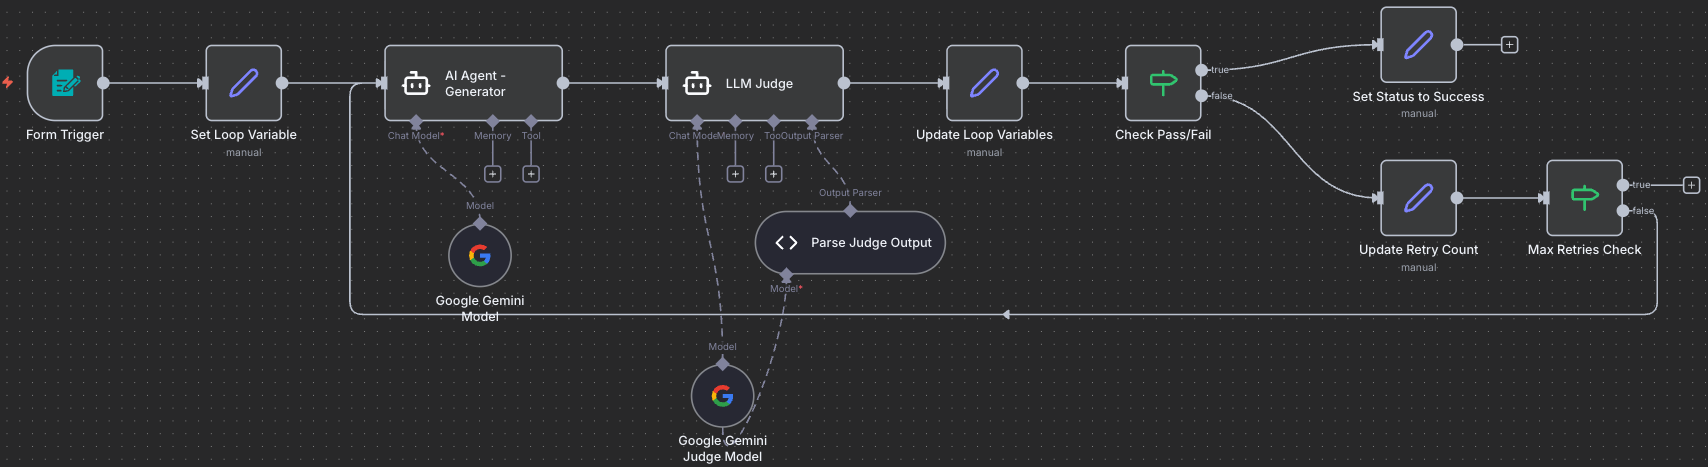
This is the key! The highlighted connection from Max Retries Check (false) back to Set Loop Variable creates the iterative improvement loop. Content that fails quality check gets sent back through the generator with feedback, creating a self-improving system.
Step 11: Add Mark Failure Node
11.1 Add and Connect the Node
- Add Edit Fields (Set) node to your canvas
- Connect it: Drag a connection line from Max Retries Check (true) output to this new node
- Rename to:
Set Status to Failed
11.2 Configure Failure Status
Mark that we exhausted retries without success:
- Field Name:
status - Type: String
- Value:
failed
Enable: Include Other Input Fields ✅ (checked)
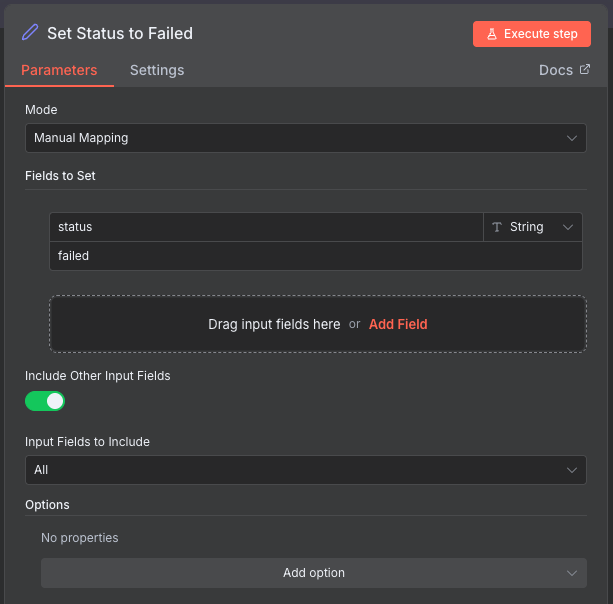
Memory carrying: Same concept - we’re adding the status field while keeping all other data (the best attempt’s output, feedback, retry count of 10).
Your workflow so far:
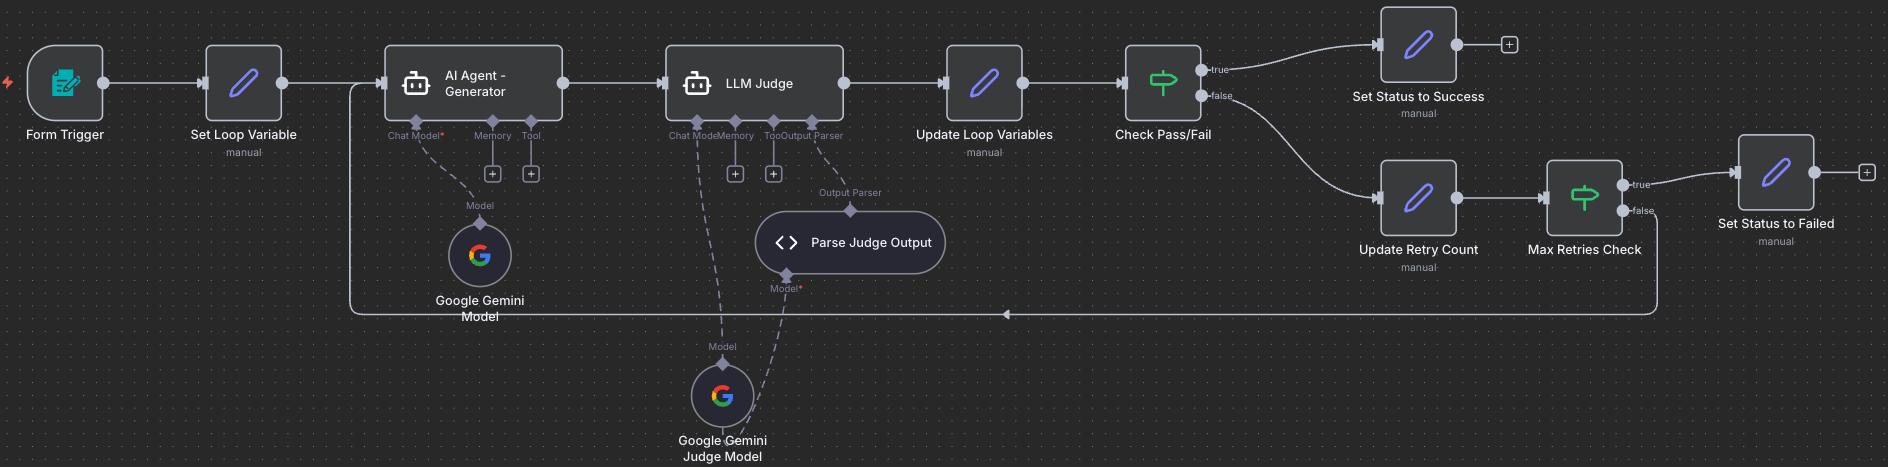
Step 12: Add Final Output Node
12.1 Add and Connect the Node
Merge point: Both the success and failure paths converge here. This node formats the final response that gets returned to the user via the form.
- Add Edit Fields (Set) node to your canvas
- Connect it: Drag connections from BOTH Set Status to Success and Set Status to Failed to this new node
- Rename to:
Final Response
12.2 Configure Output Format
Structure the final response:
| Field Name | Type | Value |
|---|---|---|
| status | String | {{ $json.status }} |
| evaluation_result | Boolean | {{ $json.evaluation_result }} |
| feedback | String | {{ $json.feedback }} |
| output | String | {{ $json.output }} |
| retry_count | Number | {{ $json.retry_count }} |
Disable: Include Other Input Fields ❌ (unchecked)
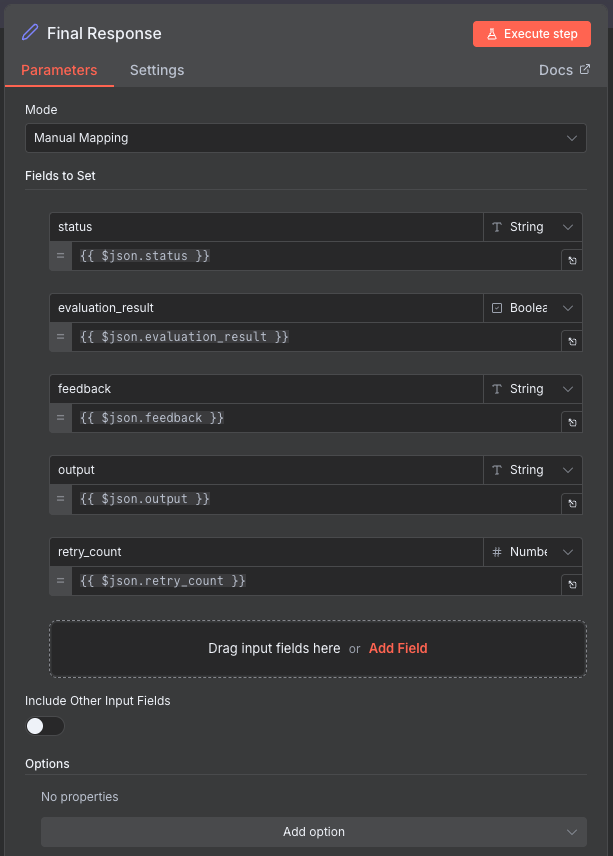
When NOT to carry memory: In this final node, we uncheck “Include Other Input Fields” because we want to return ONLY these specific fields to the user. We don’t want to flood them with all the internal workflow data (loop variables, intermediate values, etc.). We’re being selective about what goes back to the form!
Expected Output: Clean, formatted results showing only status, output, feedback, and retry count.
Your complete workflow:
Workflow Complete! All nodes are connected and the iterative quality improvement loop is fully functional. The workflow can now generate content, evaluate it, and iteratively improve it up to 10 times until it meets quality standards.
Step 13: Test the Complete Workflow
13.1 Activate the Workflow
- Click Activate toggle in the top-right corner
- Copy the Form URL from the Form Trigger node
13.2 First Test Run
- Open the form URL in a new browser tab
- Fill in the form with the example task (see Step 2)
-
Submit the form
- Watch the execution in n8n:
- Generator creates first draft
- Judge evaluates
- If failed: Loop back for iteration 2
- Repeat until pass or max retries (10)
- Return final result to form
- Check the results:
- You should see the final output in the form
- Check the status (success/failed)
- Read the generated content
- Review feedback and retry count
13.3 Expected Behavior
Scenario 1: Success in 2-3 iterations
1
2
3
4
5
Iteration 1: Failed → Feedback: "Missing specific lunch details"
Iteration 2: Failed → Feedback: "Word count too high (175 words)"
Iteration 3: Passed! ✅
Status: success
Retry Count: 3
Scenario 2: Max iterations reached
1
2
3
4
Iteration 1-10: All failed for various reasons
Status: failed
Retry Count: 10
Final feedback: "Best attempt after 10 iterations"
Understanding the Flow
Visual Execution Path
Success Path:
1
2
Form → Initialize → Generator → Judge → Merge → Check (PASS)
→ Mark Success → Final Output → Return to Form ✅
Iteration Path:
1
2
3
4
Form → Initialize → Generator → Judge → Merge → Check (FAIL)
→ Increment Retry → Max Check (< 10)
→ [Loop back to Initialize with feedback]
→ ... → Eventually Success or Failure
Failure Path:
1
2
... 10 iterations ... → Max Check (≥ 10)
→ Mark Failure → Final Output → Return to Form ⚠️
Key Variables Tracked
| Variable | Purpose | Example |
|---|---|---|
retry_count |
Current attempt number | 3 |
max_retries |
Maximum allowed attempts | 10 |
previous_feedback |
Fed back to generator | "Add lunch location details" |
evaluation_result |
Pass/fail status | true |
output |
Latest generated content | "Dear Sarah, ..." |
feedback |
Judge’s feedback | "Excellent! Meets all criteria." |
status |
Final workflow status | "success" or "failed" |
Step 14: Optimize and Tune
14.1 Adjust Retry Limit
If too many runs are failing:
- Increase
max_retriesfrom 10 to 15 or 20 - Or make success criteria less strict
14.2 Improve Judge Prompts
Make evaluation criteria more specific:
- Add examples of passing vs failing content
- Define exact requirements
- Provide scoring rubrics
- Use comparative language (“must have X AND Y”)
14.3 Test Different Scenarios
Try various task types:
- Short content: Social media posts (50 words)
- Medium content: Emails (150 words)
- Long content: Blog posts (500 words)
- Technical: Code explanations
- Creative: Story introductions
- Professional: Business proposals
Troubleshooting
Workflow keeps looping infinitely
Cause: Max retries check might be wrong
Fix:
- Verify Max Retries Check condition:
retry_count >= max_retries - Ensure the true branch goes to Mark Failure
- Check that Initialize Variables increments properly
Generator doesn’t improve on iterations
Cause: Feedback not being passed correctly
Fix:
- Verify Increment Retry sets
previous_feedbackcorrectly - Check that Initialize Variables preserves
previous_feedback - Ensure Generator prompt uses
$json.previous_feedback
Judge always passes or always fails
Cause: Judge prompt too lenient or too strict
Fix:
- Adjust judge prompt severity
- Make success criteria more specific
- Add examples of passing/failing content
- Test with different Gemini model versions
Form doesn’t return results
Cause: Response mode not set correctly
Fix:
- Verify Form Trigger Response Mode is set to
Last Node - Ensure Final Output node is connected properly
- Check that workflow is activated
What You’ve Accomplished
- ✅ Built complete LLM as a Judge workflow with form interface
- ✅ Implemented iterative quality improvement loop (up to 10 retries)
- ✅ Created structured evaluation system with pass/fail logic
- ✅ Added loop controls and exit conditions
- ✅ Tested with real content generation tasks
- ✅ Learned how to tune quality thresholds and prompts
Next Steps
Now that your workflow is working:
- Test Different Content Types: Try emails, blog posts, code, documentation
- Analyze Patterns: Track common failure reasons
- Optimize Prompts: Refine generator and judge based on results
- Adjust Strictness: Balance quality vs iteration count
- Try Challenge Tasks: Multi-criteria evaluation, A/B testing, automatic optimization
Compare Your Solution
Want to check your work or troubleshoot issues? Download our model answer:
Download Model Answer: llm-judge-workflow.json
Using the Model Answer: Import this into n8n to compare with your solution. You’ll still need to configure Google Gemini credentials after importing.
Push Your Workflow to GitHub
Export and Save Your Work
Now that you’ve built your workflow, it’s important to save it to your GitHub repository. This creates a backup and allows you to track changes over time.
Export Your Workflow from n8n
- In your n8n workflow canvas, click the three-dot menu (⋮) in the top-right corner
- Select “Download” or “Export workflow”
- Save the JSON file to your computer with a descriptive name:
- Example:
llm-judge-workflow.json
- Example:
Tip: The exported file contains your entire workflow structure, but credentials are not included for security reasons.
Upload to GitHub via UI
- Navigate to your GitHub repository in your web browser
- Go to the workflows folder (or create one if it doesn’t exist):
- Click “Add file” → “Create new file”
- Type
workflows/in the filename field to create the folder
- Upload your workflow:
- Click “Add file” → “Upload files”
- Drag and drop your exported JSON file, or click to browse
- Alternatively, click “Create new file” and paste the JSON content
- Commit your changes:
- Add a commit message:
Add LLM as a Judge workflow - Choose “Commit directly to the main branch” or create a new branch
- Click “Commit changes”
- Add a commit message:
Success! Your workflow is now safely stored in GitHub and can be shared with others or imported into a different n8n instance.